Phishing is a type of online fraud to trick people into providing sensitive information, such as usernames, passwords, and credit card details. The perpetrator pretends to be a trustworthy individual or entity.
You may want to run a phishing campaign to observe areas where training is needed and to get an understanding of the level of cyber security awareness among customers. Using a template, you can create a simulated phishing email that is sent to some or all of your customers at selected times. You can then create a training campaign to help increase your customers' cybersecurity awareness. When you create reports, you can see the effectiveness of your campaigns.
To create a new phishing campaign, select Phishing Campaigns, and then choose between creating a standard campaign or an auto campaign:
If you select Create Standard Campaign, then you'll step through the entire process of setting up a campaign, moving through each UI to select a template, enter campaign details, schedule duration, and so on.
If you choose instead to Create an Auto Campaign, then you'll select one of four pre-configured campaign schedules, which you may also customize.
If you decide to create a standard phishing campaign, then you'll need to set up the campaign in the following order:
Create Reactive Training (only applicable if you select Reactive Training on the Campaign Details page).
Modify Template (only applicable if you select Single Lure when choosing your template).
The first step in creating a standard phishing campaign is to select the email template(s) that will be used in the phishing campaign. You can select from one to ten templates, each containing a lure, which can be based on various themes. The lures are designed to attract a recipient's attention so that they engage with the email in some way — by opening it, clicking on a link, entering data, and so on. In this way, you'll help people to be more cyber-risk aware.
Note
A useful tool for planning your phishing campaigns is the SafeTitan MSP Roadmap. You'll find useful tips in Phishing Campaigns: Tips for MSPs that you can consider when you're selecting your email template(s), as described below.
Before making your template selection, you'll need to decide if you want to use a single lure or multiple lures to send to your recipients. You can do this by switching the toggle at the top of the Template Selection page.

Single Lure (Default): If you use a Single Lure, then you only need to select one template. This means that only one phishing email is sent to all recipients simultaneously at publication time. If this is your first phishing campaign, then selecting a Single Lure is the recommended option.
Multi-lure: If you want to select more than one template, you can switch the toggle to Multi-Lure. This means that you can select up to ten email templates, thereby having potentially ten types of lures in one campaign. It is advisable, however, to consider the type of security theme you want address in your campaign, and select the templates to support that theme. The emails are randomly sent during the course of the phishing campaign.
Select Filter Templates to help you find the email you want to use in the phishing campaign.

Using the options that are displayed, you can filter the templates as follows:
Choose Template Filters: Select the checkbox(es) to display templates based on their type, such as Home and Personal; Business; C-Suite; Attachments.
Note
C-Suite refers to executive titles in an organization, where C stands for "Chief", such as Chief Executive Officer or Chief Financial Officer. C-Suite is available once C-Suite information has been populated.
Choose Category Filters: Email templates can be displayed according to their lure categories, such as Banking, Shopping, and so on.
Choose Complexity Filters: You can display templates based on how complex you want the lure to be: Low, Medium, High.
Choose Creator Filters: You can choose from templates that are pre-populated or ones you have created.
Choose Country Filters: As different lures are associated with different countries, you can filter the email templates according to countries.
Select OK to filter the results. If you want to clear the results on the Template Selection page, select Reset Filter.
For further help in locating a template, you can use both the sort and search functionality.
Click the up/down
 arrows in the column titles to sort the contents in ascending or descending order.
Enter a word in the Search field to filter results with that word.
Select the checkbox beside the template you want to use, and then select Next Section to enter campaign details.
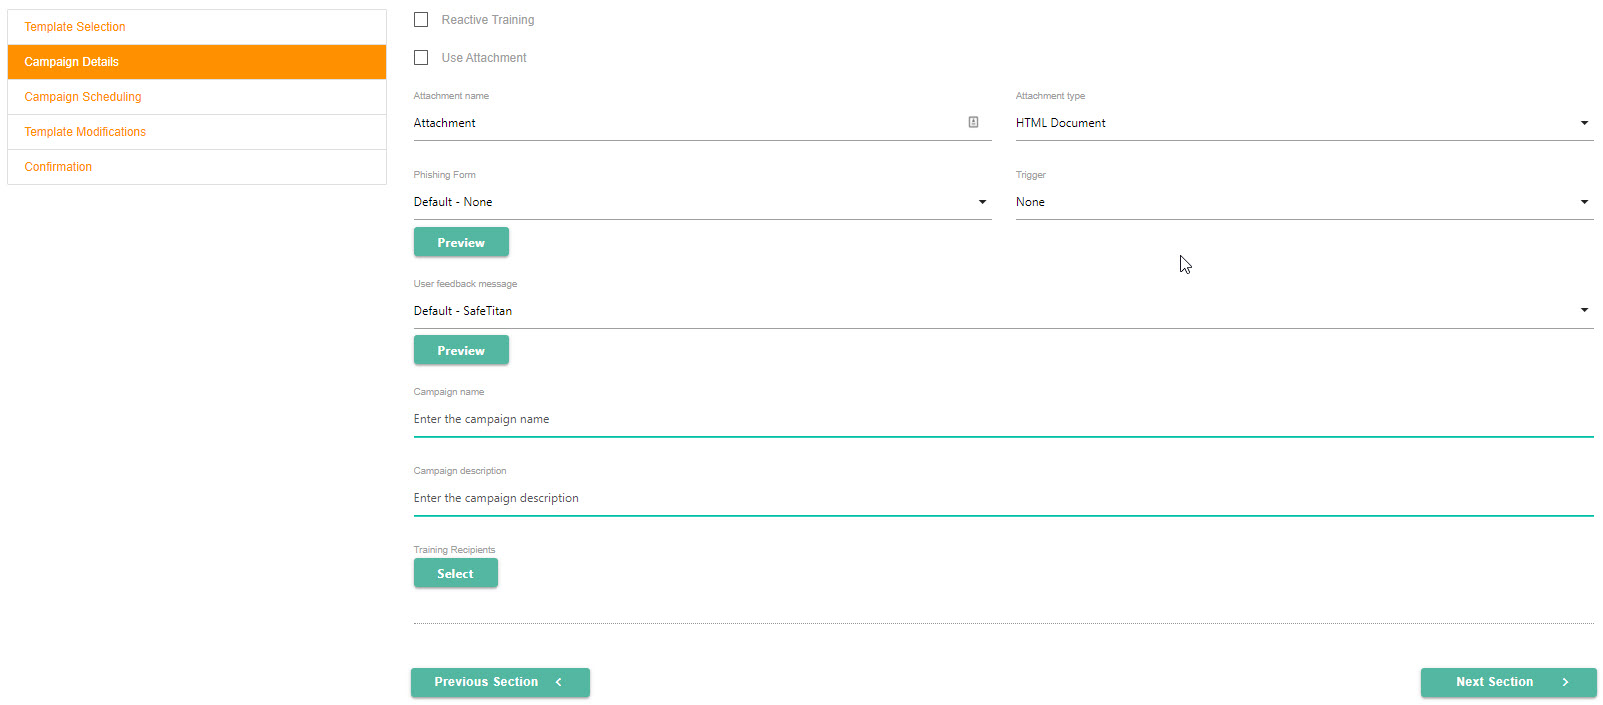
The second step in creating a phishing campaign is to enter the campaign details.
To enable Reactive Training for your campaign, select Reactive Training. Phishing campaigns with reactive training provide the ability to identify and evaluate high-risk users and automatically enroll these users in phishing awareness training. if you select Reactive Training, then you'll set that up in the next section.
If you want to include an attachment in your email, select Use Attachment, and then select the download icon in the Attachment name field to attach it.
In the Attachment type field, select HTML, Word or Excel to identify the file type.
Select the phishing form you want the user to see in the Phishing Form field. Select Preview to see the content.
The Trigger field displays a range of actions that a user could take on a phishing form. Based on the option you select, the user receives a warning message after performing that action, as described below:
None: If you want to track a user's actions without sending them a warning message, select this option.
Enters Field: User clicks in either the User Name or Password field in the phishing form, which triggers the warning message.
Types in Field: Select this option if you want the user to get a warning message when they attempt to enter information in any of the phishing form fields.
Posts Form: User completes form and attempts to submit it, triggering the warning message.
In the User Feedback Message field, you can select the message that you want the user to see when they click on an embedded phishing email link or open a phishing attachment. Select Preview to display the message.
Enter a Campaign Name to identify the campaign.
Enter a Campaign Description that provides details to help you recall when and why you created the campaign.
To add Training recipients, click Select. In the window that opens, you can select the customers you created in Create New Customer. If you have created Customer Groups, you can also select those.
If you have a large number of recipients, you can use both the sort and search functionality:
Select the column titles to sort the contents in ascending or descending order.
Enter a word in the Search field to filter results with that word.
Select Confirm when you are finished.
Select Next Section.
If you enabled Reactive Training on the Campaign Details page, then you'll set that up next.
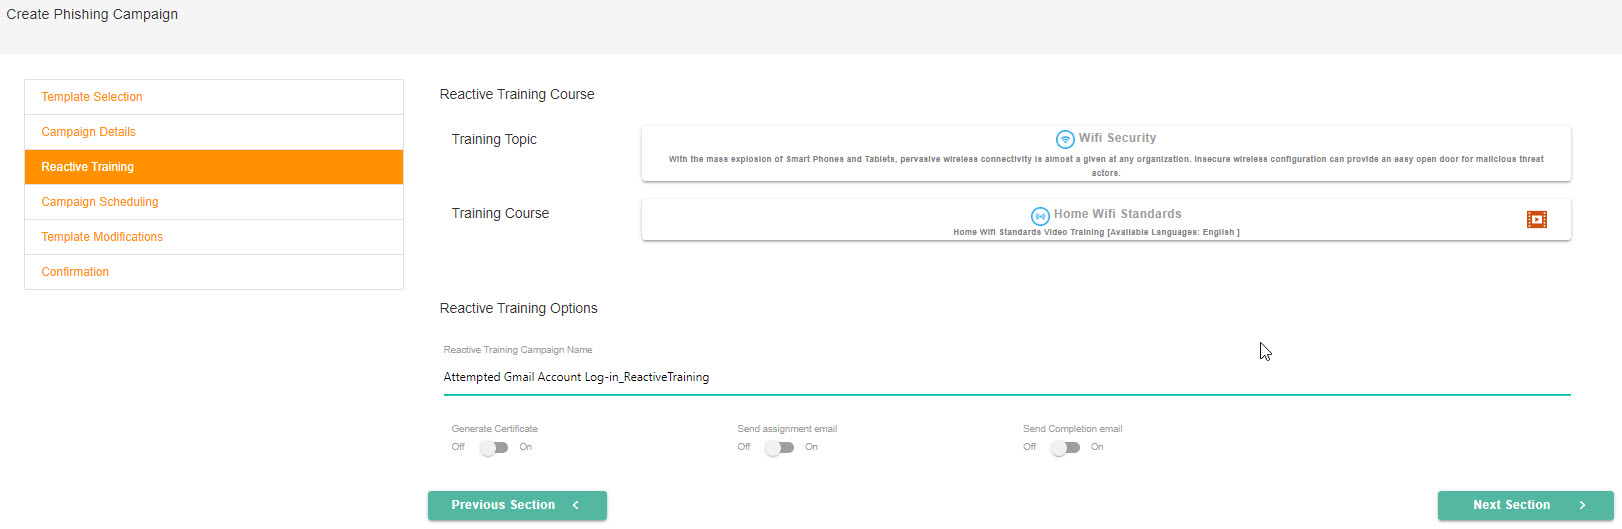
Select the section beside Training Topic, which will display a dropdown menu. You can scroll through a list of training topics and select one for your reactive training campaign.
Next, you'll select a training course by clicking in that section. Depending on the Training Topic you selected in Step 1, the Training Course list will populate accordingly.
In the Reactive Training Options section, you can set up additional details for your campaign:
Reactive Training Campaign Name: The campaign name that you entered on the Campaign Details page automatically populates this field, and adds Reactive Training to the end; for example, Attempted Gmail Account Log-in_Reactive Training.
Generate Certificate: (default = Off) If you want your customers to receive a certificate after they've completed their training, then turn this toggle On.
Send Assignment Email: (default = Off) You can send assignment emails to your customers by turning this toggle On.
Send Completion Email: (default = Off) If you turn this toggle On, then your customers are notified when they've completed the training.
Select Next Section.
The next step in creating a phishing campaign is to schedule the campaign.
Select the Publish Start field to enter the date and time you want the phishing campaign to start.
The Publish End Date field is only applicable if you chose Multi-Lures when selecting your templates. You need to enter a Publish End Date to indicate the date on which you want the campaign to stop sending emails. The campaign, however, will continue to ingest results up to the Completion date, as described next.
In the Completion date field, select the date and time you want the phishing campaign to end. It must be a minimum of two weeks after your Publish end date. Note that no data is collected after the completion date.
Note
If you have set up Reactive Training for your phishing campaign, then be aware that a recipient has two weeks to complete the training following the campaign end date. The two-week completion date for reactive training is automatically set up when you create the campaign.
When you have entered the details required, select Next Section.
This is an optional step, and only available if you send a single lure. You may modify the default values pertaining to the sender and subject in the email template you want to use. Follow the steps below to customize these values:
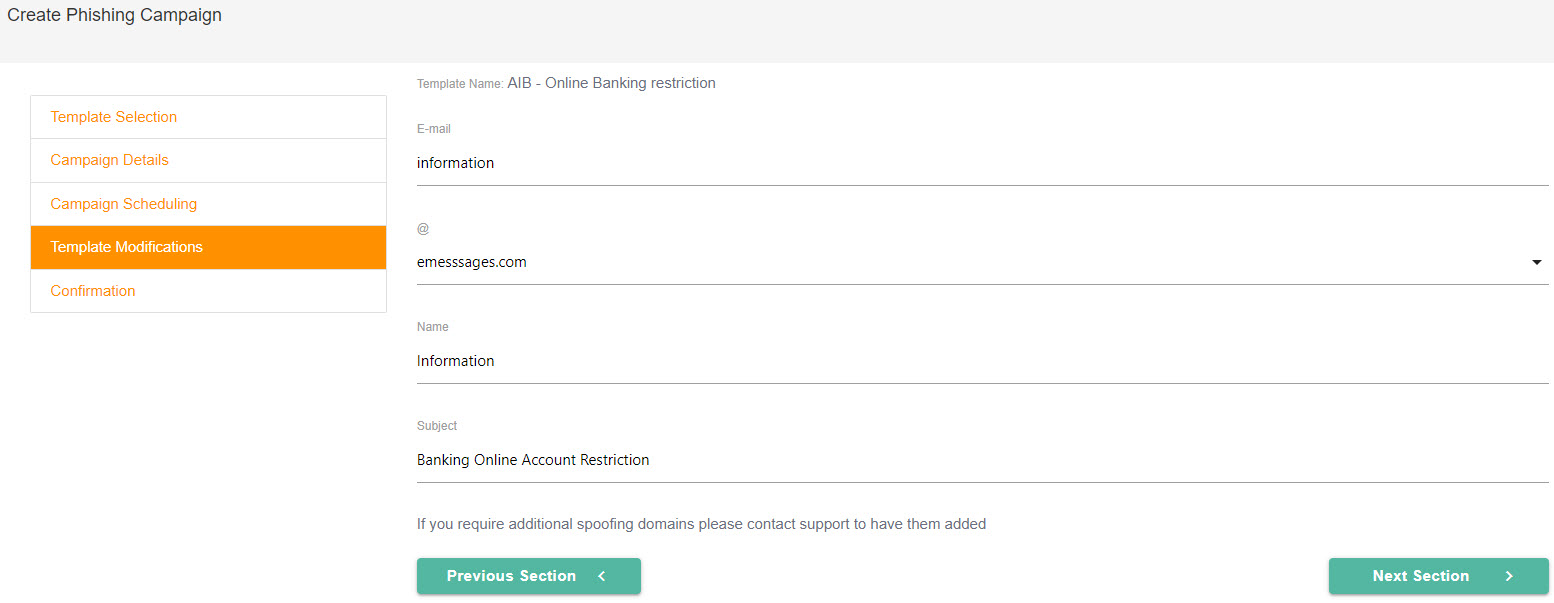
Select the Email field to edit the name of the email sender, such as info or admin.
In the @ field, you can change the domain of the email sender, for example, e-messages.com or e-owa.com. If you want more spoofing domains, please contact Support to have them added.
In the Name field, you can edit the sender's name as you want it to appear in the recipients' email inbox.
If you want to edit the subject, you can do this in the Subject field.
Select Next Section to finish creating the phishing campaign.
This is the final step in creating your phishing campaign. Review the summary of your campaign and when you are satisfied that the information is correct, select Create Campaign. Your new phishing campaign will be listed on the Phishing Campaigns page, which you can access from Dashboard > Phishing Campaigns.
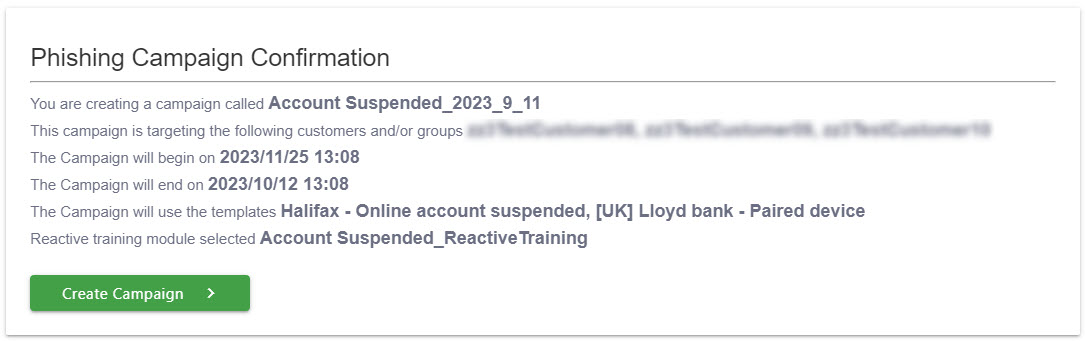
If you notice an error, you can go back to the previous steps and make changes. The Confirmation page will automatically update.
You can review your phishing campaign and its results by going to your Customer portal, and selecting Phishing Manager. See Review Phishing Campaign for more details.
As an MSP, you can set up automatic campaign schedules for your customers by accessing Phishing Campaigns > Create Auto Campaign. You'll find four pre-configured schedules, which you can also customize, giving you both efficiency and flexibility in one interface.
Tip
Refer to the SafeTitan MSP Roadmap for additional help in planning and rolling out your security awareness campaigns.
From your MSP dashboard, go to Phishing Campaigns > Create Auto Campaign. The schedule options are in increments of 3, 6, 9 and 12-month durations:

They are pre-configured based on the following:
Campaign Frequency: How often a campaign runs during the schedule.
Each Campaign Duration: The length of time each campaign runs.
Schedule Starts: The timeframe within which the campaign schedule starts.
Schedule Ends: The date that the campaign schedule ends.
Template Option for Phishing lures: By default, both template categories, Business and Home & Personal, are enabled. This means that when the campaign is being created, a template is randomly chosen from either of theses categories.
Complexity: A template can be of Low, Medium, or High complexity and different combinations of these levels are pre-selected for you. The level of complexity relates to how sophisticated a lure is, and how likely a recipient is to interact with the lure.
Click Select in the schedule you want.
Enter a name for the campaign schedule in the Schedule Name field.

Select Add Recipients to open a window in which you can select individual customers as well as customer groups.

The window defaults to individual Customers but you can select Customer Groups at the top to change the view. You can also click on the headings to sort the content in the columns or use the Search field to find a specific customer or group.

When you are finished making your selections, select Confirm to continue.
If you want to customize any of the content, select Edit. The pre-populated fields become editable, as described below:
Campaign Details: In the Campaign Details section, you can change the number of campaigns you want to create, their frequency, and how long they should run. Note that the maximum number of campaigns you can enter is dependent on the frequency you choose, and your Frequency options are automatically adjusted, depending on the number of campaigns you enter. The guideline is two campaigns a month, as illustrated in the table below.
Depending on the length of the campaign schedule you are customizing, the campaign duration options range from 1 to 2 weeks (for a 3-Month Schedule) to 1 or 3 Months for longer schedules.
Scheduling & Lures: In this section, you can reschedule the campaign and change the Lure categories.
Select the Calendar
 icon under Schedule starting In and then select the month that you want your first campaign to begin running.
To customize the end date, select the dropdown arrow under Scheduling ending in. If you are customizing the end date of either the 3- or 6-month phishing campaign schedule, you can select an option between 1 and 24 months. The 9- and 12-month campaign schedules offer end dates of either 1 or 2 Years.
To adjust the Lure Categories for your campaigns, select the dropdown arrow in the Lure Categories field. All the lures are enabled by default, but you can choose Select None and then select the categories that you want.
Template Options: This section lets you adjust template types and their complexity levels.
When your phishing campaign is being created, it will randomly select one of the Lure Categories you enabled, and then create a template based on the template type(s) and complexity level(s) you selected.
When you're finished, select Create Schedule. A Summary Data window appears, providing the details of the Campaign Schedule you're about to create.
Select Confirm to proceed. The new campaign schedule appears in the list on the Phishing Campaigns page.